This project started out as an assignment for school, where we had to create a measurement system from selected sensors, to measure volume. I chose a load cell for getting the mass and a thermistor to get the temperature for temp variable density.
Requirements
To successfully create this measurement system we require couple of components for which I’ll include links.
- Arduino Uno ->Official store
- HX711 & Load cell ->Amazon
- Thermistor -> Adafruit
- 10k Resistor -> Adafruit
- Wires -> Adafruit
- Breadboard -> Adafruit
- 3D printed parts -> Thingiverse (I recommend using the bigger bottom part) OR you can create your own testbed from wood if you have the woodworking skills.
- Arduino IDE with HX711 library -> IDE
- Reference weight
The HX711 & Load cell come unsoldered, so you also must solder them together or find an already soldered pair. You can also use your own custom parts, but keep in mind that you’ll have a different lookup table for the thermistor. The load cells parameters will also be different, but they are different from cell to cell. Arduino IDE comes with a library manager built-in so you need to install the HX711 library. I won’t cover how to do this in this guide because it’s just a google away.
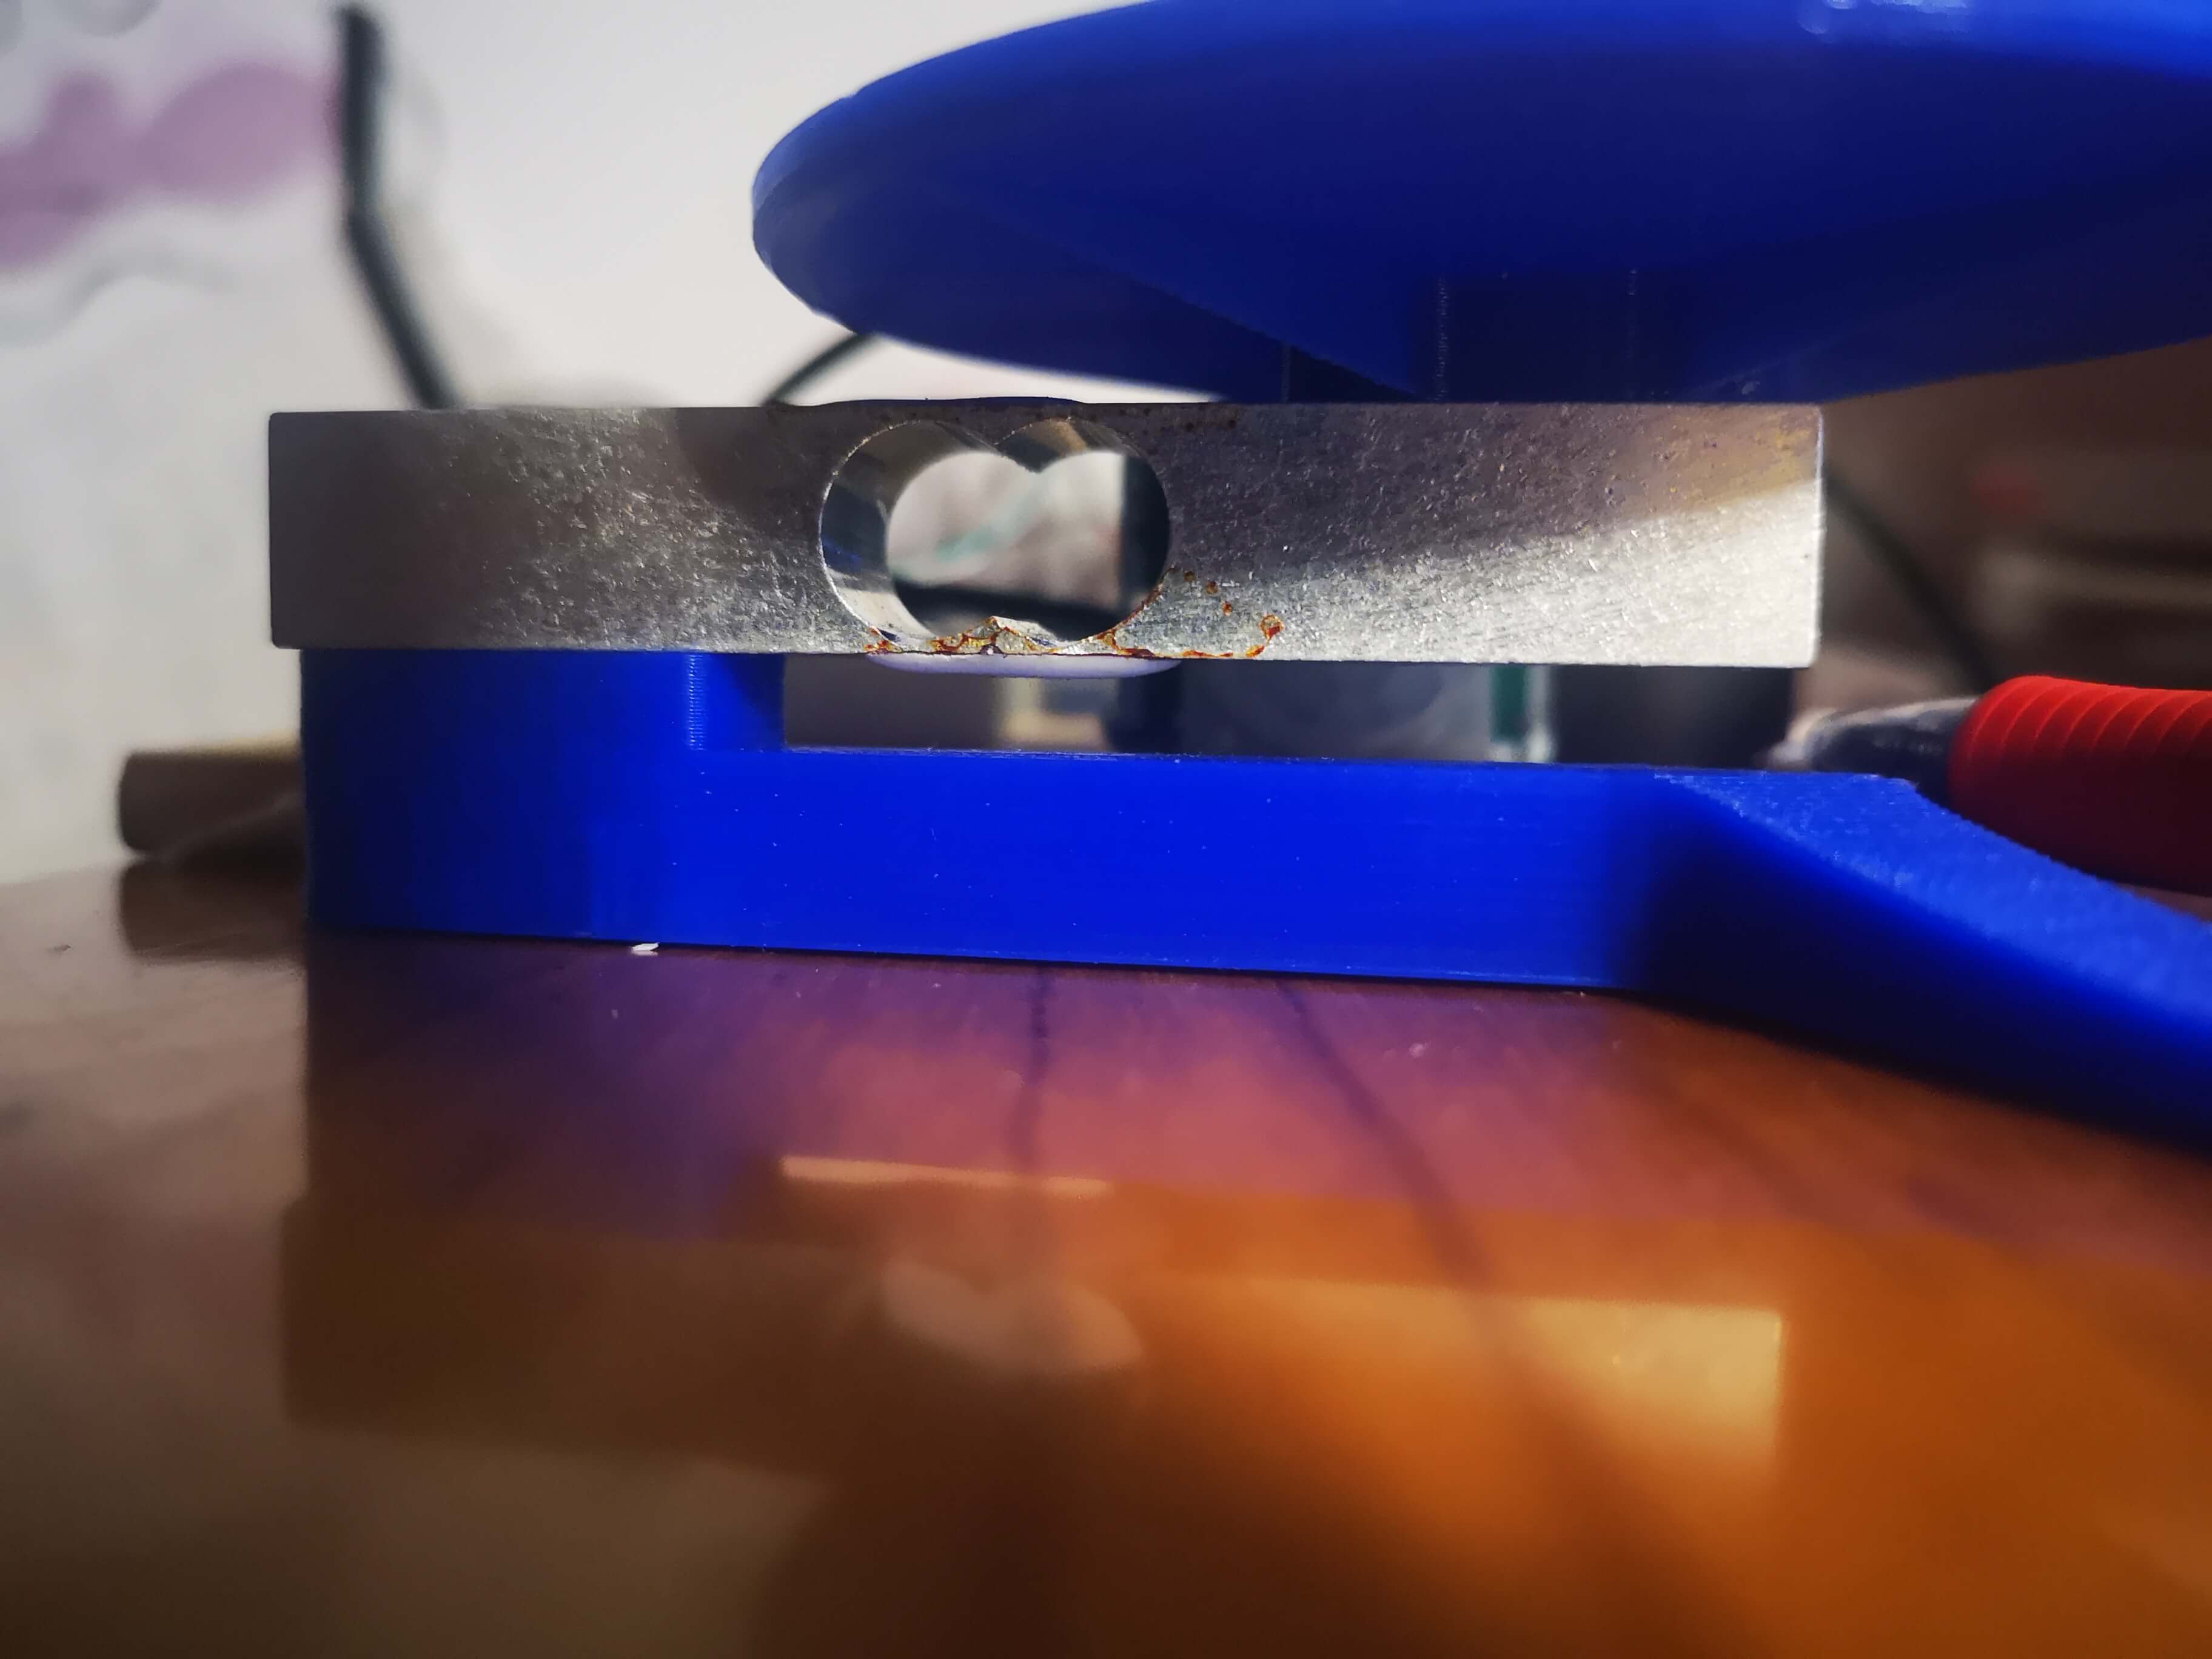
Load cell testbed

Wiring

The HX711 breakout board in the diagram is different from the HX711 used, but the pinouts are the same. The DATA and SCK pins from HX711 got to 8 and 9 respectively. The GND and VCC pins connect to GND and 5V. Following the wiring of the HX711 breakout board, the thermistor wiring is a tad bit more complicated, because it uses a pullup resistor. We use the pullup resistor because we don’t want the analog input pin A0 to float. We also use a trick where we don’t connect the pullup resistor to 5V, instead we connect it to a digital I/O pin which we will set HIGH (5V) only when measuring. This helps to prevent the current from flowing through the thermistor when not used and keeps the power dissipation lowest. So connect one end of the resistor to I/O pin number 2, the other end to one of the thermistor pins, the other end of the thermistor to GND and connect the analog pin A0 to the junction of the thermistor and resistor.
So now we have our wiring completed. Feel free to use different pins for connection but also change the pins in the configuration.
Basic program
Start Arduino IDE and create a new project.
1
2
3
4
5
6
7
8
9
10
11
12
13
14
15
16
17
18
19
20
21
22
23
24
25
26
27
28
29
30
31
32
33
34
#include "HX711.h"

// Constants
// pull up resistor resistance
#define TEMPRESISTOR 10000

// Wiring
#define THERMISTOR_PIN A0
#define THERMISTOR_PULL_UP_PIN 2
#define LOADCELL_DOUT_PIN 8
#define LOADCELL_SCK_PIN 9
HX711 scale;

void setup() {
  pinMode(THERMISTOR_PULL_UP_PIN, OUTPUT);
  Serial.begin(115200);
  // Start scale
  scale.begin(LOADCELL_DOUT_PIN, LOADCELL_SCK_PIN);
}

void loop() {
  if(scale.is_ready()) {
    float load_cell = scale.read();
    float thermistor = analogRead(THERMISTOR_PIN);

    Serial.print("load_cell: ");
    Serial.print(load_cell, 4);
    Serial.print(", thermistor: ");
    Serial.println(thermistor, 4);
  } else {
    Serial.println("HX711 not found");
  }
  delay(200);
}
As you can see in the defines if you have different connections change the pin constants accordingly.
We have our basic program that prints the received readings to the serial interface of Arduino IDE. As you might suspect this program returns raw values, but we want them to be in °C and ml. First we need to get the calibration factor for the HX711 library. Everything the library does with the factor is divide the reading with the calibration factor. To get this factor we first add float calibration_factor = 736.175; above the setup function. Then we add two lines into the setup function.
1
2
scale.set_scale(calibration_factor);
scale.tare();
And change the scale.read() to scale.get_units().
Now you have everything prepared to set your calibration factor.
- Run the program without any weight
- Place the reference weight on the load cell
- Increase the factor if read value is too high or decrease if the value is too low
- Repeat the process until the weight read and actual reference weight match
You could also write a simple addition to the program which adds/subtracts based on user input through serial. Like so:
1
2
3
4
5
6
7
8
9
10
11
12
if(Serial.available()>0) {
  char command = Serial.read();
  switch(command) {
    case '+':
      calibration_factor+=0.1;
      break;
    case '-':
      calibration_factor-=0.1;
      break;
  }
  scale.set_scale(calibration_factor);
}
Place it just above the delay(200) line. This is practical for finetuning, but when starting off it’s easier to change the value in bigger amounts and recompiling.
Getting the volume
Volume is calculated like so: \(V = \frac{m}{\rho(T)}\). Where m is mass (which we have) and \(\rho(T)\) is density. Now we want to convert the thermistor resistance to temperature to density. This can be accomplished with so called lookup tables, because the temperature in relation to resistance doesn’t follow a known curve (approximations exist, but we will not use them here).
A lookup table is a simple table with value A in one column and value B in the second. We can’t create a lookup table for all possible values so we Interpolate if we receive a reading that is between values from the lookup table. We do the same to get the density from temperature. In total we will have two lookup tables. One for the thermistor resistance temperature relationship and one for the density temperature relationship which are located here.
\[y=y_0+(y_1 - y_0)\frac{x - x_0}{x_1 - x_0}\]Place the header file into your project directory and include it in the main .ino file: #include "lookup_tables.h"
Getting the density
We create a function that uses the thermistor lookup table and turns the resistance into temperature.
1
2
3
4
5
6
7
8
9
10
11
12
13
14
15
16
17
18
19
20
21
// Function to get temperature from thermistor
float get_temp(float data[101][2]){
  float reading = 0;
  // Only 5V when reading from thermistor, prevent heating
  digitalWrite(THERMISTOR_PULL_UP_PIN, HIGH);
  // Read 10 values and calculate average
  for(int i = 0; i < 10; i++){
    reading += analogRead(THERMISTOR_PIN);
  }
  digitalWrite(THERMISTOR_PULL_UP_PIN, LOW);
  reading = reading/10;
  // Get resistance of thermistor from reading
  reading = TEMPRESISTOR / (1023/reading - 1);
  // Get temperature from lookup table (linear interpolation)
  for(int i=0; i<101; i++){
    if(reading <= data[i][1] && reading > data[i+1][1]) {
      return (data[i][0] + ((data[i+1][0]-data[i][0])*((reading-data[i][1])/(data[i+1][1]-data[i][1]))));
    }
  }
  return -1;
}
Place it at the bottom of the .ino file. Now what this function does is turns the I/O pin where the resistor is connected HIGH (to 5V), reads 10 values from the thermistor, divides by 10 so we get the average and turns the A/D value into resistance. Then it finds the range between which the reading is and interpolates to get the approximated value. We could have also used polynomial interpolation, but for the sake of simplicity we didn’t. we return a -1 if the reading is out of bounds of the lookup table. We also do the same for density, where the variable is temperature instead of resistance.
1
2
3
4
5
6
7
8
9
// Function to get density from temperature
float get_density(float temperature, float data[34][2]){
  for(int i=0; i<34; i++){
    if(temperature >= data[i][0] && temperature < data[i+1][0]) {
      return (data[i][1] + ((data[i+1][1]-data[i][1])*((temperature-data[i][0])/(data[i+1][0]-data[i][0]))));
    }
  }
  return -1;
}
Place it above or below the get_temp() function.
Now we want to use those functions in the main loop. This is quite easy, we just need to replace a couple of lines.
1
2
3
4
5
6
7
8
9
10
11
12
13
14
15
16
17
18
19
20
21
22
void setup() {
  pinMode(THERMISTOR_PULL_UP_PIN, OUTPUT);
  Serial.begin(115200);
  // Start scale
  scale.begin(LOADCELL_DOUT_PIN, LOADCELL_SCK_PIN);
	scale.tare();
}

void loop() {
  if(scale.is_ready()) {
    float temperature = get_temp(thermistor_temperature);
    float volume = scale.get_units()/get_density(temperature, water_density);

    Serial.print("celsius: ");
    Serial.print(temperature, 4);
    Serial.print(", mililiter: ");
    Serial.println(volume, 4);
  } else {
    Serial.println("HX711 not found");
  }
  delay(200);
}
And we successfully measure temperature and volume of water inside a container. I made some modifications to the program to add commands for tareing and measuring the temperature only once. So when we change containers we can retare without restarting the program. and also to measure temperature once so we don’t have to hold the thermistor in the water.
The code is accessible here.
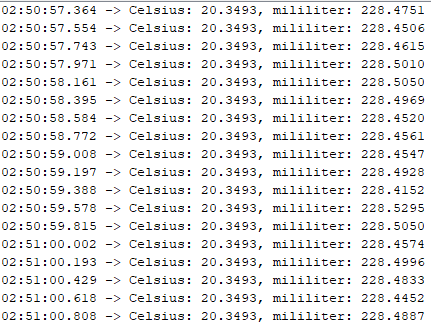
And here we have readings:

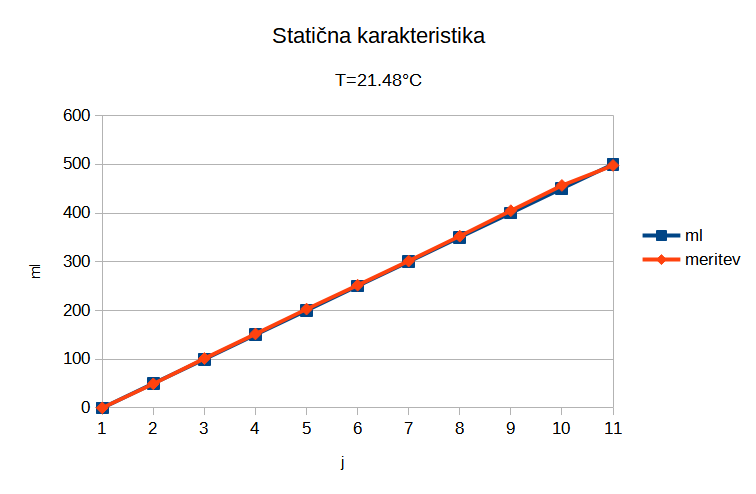
And also the chart from 0 to 500ml at 21.48°C:
